A Solderless Power Supply for Experimenters
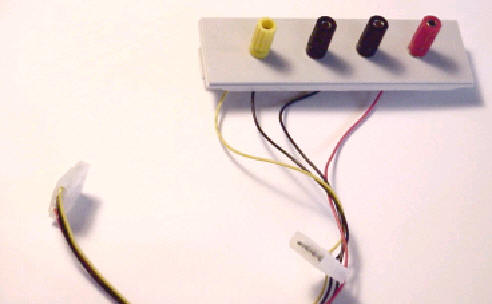
How'd you like a high-quality regulated 5V and 12V bench supply for $8 or less? You have to build it yourself, but you won't even need a soldering iron. Sound interesting? Well, there is one small catch, but read on and you might find you have everything you need already on hand. Many hams and electronics experimenters have PCs today. An increasing number of these are finding use on the workbench. Many hams program microcontrollers, use a PC-based oscilloscope, or just use the PC to control equipment around the shack. This is becoming even more practical as the resale value of computers keeps dropping. More and more, you'll find it hard to get rid of a PC when you upgrade. You might as well find a use it around the shack. Inside every PC is good quality switching power supply. The exact details depends on the PC, but you can expect to find regulated 5V and 12V often at 200W or more of power. Modern PCs rarely consume that much power, so there is plenty of spare juice for your projects. The problem is how to get to it. In this article I'll show you a quick and easy way to gain access to your PCs power supply. Of course, you need to be careful not to exceed the maximum current capacity of the supply--don't run your 100W HF rig from the PC supply! For many projects, however, you can use the +5 and +12 supplies with no ill effects. Construction is very simple. Just remove an unused drive plate. These plastic plates cover the holes where you would install a floppy disk or a disk drive. I used a 5.25 inch cover, but if you only have a 3.5 inch cover open, that should work just as well. Be sure there isn't a disk drive behind the plate -- sometimes there is a hard drive hiding behind one of these plates. Using a center punch, mark 4 holes in the plate equally spaced (the picture above has a center line of 21mm and the holes are 30mm apart). Then drill out the holes to fit 4 binding posts. You can use Radio Shack 274-662 (which require a 3/16" hole) or use whatever you have on hand. Mount the binding posts on the drive plate. You should use two black posts in the center 2 holes. It is nice if you can find a red post for the 5V supply and another color post (I used yellow) for the 12V supply. However, if you are buying parts at Radio Shack, you'll probably have to settle for two red posts. My yellow post is a different brand so I had to drill an odd size hole for it. The next piece of hardware you need is a Y splitter (Radio Shack 278-761, for example). This is a wiring harness that plugs in to the connectors that the power supply provides and ends in two similar connectors. You usually use these when you have run out of connectors and you want to add something else to your PC. Locate one of the female connectors on the Y splitter and cut it off close to the connector body. Strip the wires back about a half inch. If you are meticulous, you could crimp on some spade lugs or ring terminals to the wires. However, you can also just work with the bare wire. The splitter has two black wires (ground), a red wire (5V) and a yellow wire (12V). Connect these to the appropriate binding posts. Feed the wiring harness back into the PCs body and reinstall the drive plate. If you can locate a free connector from the power supply, just plug the mating connector on the harness into it and you are set. If you don't have a free connector, don't worry. Find the closest disk drive and gently remove the power connector from it. Replace it with the connector from the wiring harness. Then plug the newly freed connector into the harness. Now the drive has power, and so do the binding posts. Here's what it looks like ready to install:
Before your button up the PC, take a look at the power supply's label and see if you can get idea of how many amps the supply can handle. Of course, the PC is taking some of this power, but the trend has been towards lower-powered cards and drives, making most PC supplies quite large for their typical load. Turn on your PC and measure the voltage at the binding posts. Voila! Instant power supply. There are many things you could do spruce this project up. For example, you could mount a cheap digital panel meter in another drive plate to monitor the voltage or current. You could also mount an inline fuse holder in the wires leading to the binding posts. In particular, if you short something accidentally, you run the risk of damaging your PC. Every time I've done this, the power supply just shut down until I cycled the input power (with the short removed) and there was no other harm done. Whatever you do, you'll get a useful addition to your bench and one other benefit. Everyone who sees those posts sticking out of your PC will want to know what they are for! By the way, another good way to get a 5V supply is to cut the end off of a USB cable, find the red and black wires (make sure with a voltmeter) and connect them to some sort of connector or binding posts. This has the advantage of being highly portable. Powered USB hubs can provide 500mA at 5V and many are current limited! |