Have you ever read one of those vacation books that say
something like, "Paris on $4 a Day"? Yeah, right. Well, if you can
solder, have a PC, and an HF radio, you can get on RTTY this weekend (today,
even, if you really want to) for under $12. You'll have the satisfaction of
getting on the air with something you built yourself too. Here's a project that
doesn't require any coils, fancy test equipment, and you can get all the parts
at Radio Shack (some of them might be cheaper at EPO, though). Even if you can't
transmit (or you don't have a transmitter), you can use this gear to receive
RTTY on the ham bands and other places where RTTY is used. With some different
software, it will also copy SSTV and FAX!
Getting Started
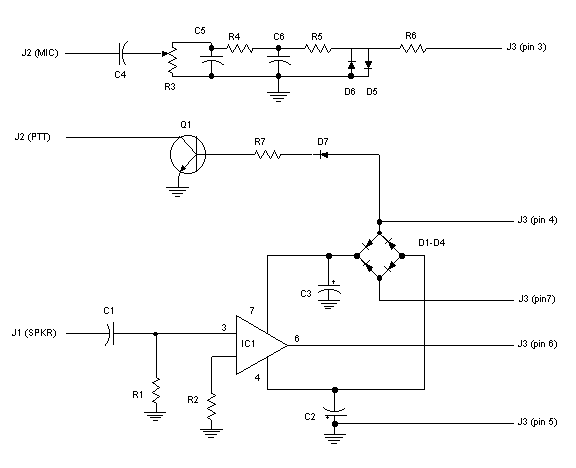
Take a look at the parts list, and cross off everything you already have. You'll also need a mic connector for your radio and a connector to get the receive audio, too. Some rigs have special jacks for this very purpose on the back. Others have rigs have receive audio on the mic jack. Worse case, you can use an ordinary mic connector and a earphone jack and just connect and disconnect them when you want to use the RTTY modem.
The parts list includes a Radio Shack universal PC board, but you don't really need it. I built my first one of these circuits on a white prototyping board. You can use perf board or just about anything that will hold the circuit.
The only other place you might want to change things
around a bit is J3. I have J3 as a 9 pin DB9 male connector. However, if you use
this, you'll have to also have a cable to connect to your PC. If you have a
spare cable lying around, cut one end off and wire it directly to the circuit.
Then you can plug the cable directly into the PC saving a bit more money.
Besides, if you ever want to put your modem in a nice case, it is easier to
drill a hole for a cable than it is to punch a hole for a D connector!
What Else?
Before you run off to Radio Shack, check out Terry Mayhan's Web site at http://www.accessone.com/~tmayhan. Terry runs the unofficial HAMCOMM home page and has a wealth of information about this circuit. While you are there, download the HAMCOMM software. This is the part that runs on your PC. It is a DOS program, so it doesn't need anything fancy, and you'll probably have to exit Windows to run it.
UPDATE: That site isn't up anymore, but try http://www.pervisell.com/ham/hc1.htm instead (thanks to Doug Rich).
This program, by the way, is shareware (written by a German amateur). If you use it, you should register it (I did). When you register it, you get a few extra features and a nice feeling. The software is worth every penny of the $30. Still, you can try it out for absolutely nothing.
There are other software programs that will use this
style of modem, including JVFax for fax and SSTV and PKTMON for packet. Still,
get HAMCOMM working first. Then you can try other software.
Heat Up the Iron!
Construction of the circuit is not critical. Be careful to get the diode polarities right (same goes for the electrolytic capacitors). The HAMCOMM web page I mentioned has a layout for the receive portion of the circuit that happens to fit the PC board I mentioned. When you buy the PC board, it comes in two parts. You could build the receive part on one side, and the transmit part on the other.
Once you are finished, you'll be anxious to hook the audio input up to your rig and try it out. Get the receive working first. Make sure you can copy signals first. Then you can try transmit. Here's a few tips:
� Look for RTTY activity around 60kHz to 100kHz above the start of each major HF band (20 meters is especially active).
� Not all strange signals are RTTY. There is a lot of PACTOR today. If you register HAMCOMM you can receive PACTOR, but not send it. You can hear the different sounds on your PC at http://www.wunclub.com/sounds/ or http://www.scs-ptc.com/sounds.html.
� HAM RTTY is nearly always 45 baud at 170Hz shift. Use LSB unless your radio has a special FSK mode. Even then you may have to use LSB anyway when you start transmitting.
� Look for strong signals at first. HAMCOMM works best with a sharp filter (250Hz is ideal). Barring that, look for a loud, quiet signal.
� Read the HAMCOMM manual. It takes a little practice to tune in RTTY signals. HAMCOMM has some excellent tuning indicators that help.
�
If things don't work, the HAMCOMM manual has a troubleshooting
guide. Take a break, check your connections, check polarities, measure a few
voltages. Don't be too quick to blame a bad part.
How's it Work?
You might wonder how such a simple circuit could possibly work. There isn't even a power supply. Well, the circuit draws its power from the PC's serial port. The first version of this I built used two 9V batteries so I could omit D1-D4 and the electrolytic capacitors.
IC1 is an op amp and in this configuration it is called a zero-crossing detector. What that means in English is that the op amp's output indicates when the signal crosses zero volts. The output of the op amp goes to the PC's serial port, so smart software on the PC can count the number of zero crossing in 1 second to determine the input signal's frequency. The rest is simple programming.
On the transmit side, HAMCOMM toggles a bit on the
serial port to generate tones as a square wave. The parts that connect to the
mic jack filter the tones. When you feed two pure tones into a SSB transmitter,
it mimics frequency shift keying (this is known as AFSK or audio frequency shift
keying). If the tones aren't pure, you will get more harmonic spurs which is
bad. By default HAMCOMM uses high tones so that your transmitter will tend to
cut off harmonics. If you lower the tones that HAMCOMM's software uses, be sure
to get someone to listen to your signal to make sure it isn't compromised. The
transistor switches your transmitter on and off via the PTT line.
One note about transmitting: RTTY keeps your transmitter
going full-blast 100% of the time. Many rigs are not able to maintain full
output power all the time. If you aren't sure (look for words in your manual
like 100% duty cycle), crank the power down. RTTY doesn't need a lot of power,
and your radio will last longer if you run it at 50% of full power. If you
really want to crank it up, you might need to add an external fan to cool your
final amplifier. Of course, if you have a radio (like my TS570D) that is rated
for 100% duty cycle, you'll have no troubles.
What's Next?
HAMCOMM does other modes including CW (but poorly in my
experience) and AMTOR. AMTOR is a special form of RTTY that does error
correction. It is great, but not in widespread use anymore. You will
occasionally find some AMTOR on the bands. Also, if you are ragchewing with
someone on RTTY ask if they can do AMTOR. Many modern TNCs can do AMTOR, and
you'll find that having a solid copy no matter how bad the band conditions are
is very pleasant.
If you like HAMCOMM, you should register the program. Next,
you might want to build your interface in a nice box. One of mine lets you plug
the mic and speaker into the box and switch between voice and RTTY operation
with a flick of a switch. You can also add some rudimentary filtering to the
HAMCOMM circuit (see the HAMCOMM site for more about that). Of course, if you
have a modern rig with a DSP, you'll have all the filtering you could want. The
nice thing is that they are so simple, it is easy to experiment.
If you really get the RTTY bug, you'll want something that can do PACTOR. Most people wind up with the MFJ 1278 (that's what I have) or the KAM TNC. These boxes do everything, but when you switch you will sure miss some of HAMCOMM's neat features (especially the tuning indicators).
Also be sure to check out PSK31, the hot new mode that uses
a Windows program and your sound card. It has incredible weak-signal
performance! You can get free software from G3PLX at http://www.kender.es/~edu/psk31.html.
Also you can find my free front end software for G3PLX's program (PSKGNR) at my
site
Get Going
Quit reading and turn on your soldering iron already! And when you get tired of RTTY, you can always download JVFAX, drop by 14.230 MHz or 14.233 MHz and trade pictures with the SSTV guys!
73 de WD5GNR
Parts List
Note: The parts list shows Radio Shack part numbers
because Radio Shack is everywhere. However, you can probably get many of the
parts for much, much less. Check out http://www.al-williams.com/wd5gnr/buy.htm
for lots of places to buy parts.
|
Part |
Description |
Quan. |
RS Part # |
Price |
|
IC1 |
741 op Amp |
1 |
276-007 |
0.79 |
|
--- |
PC Board |
1 |
276-159 |
1.69 |
|
J1, J2 (see text) |
??? |
? |
??? |
??? |
|
J3 |
DB9 |
1 |
276-1537 |
0.99 |
|
C1, C4 |
.1uF capacitor |
1 |
276-1069 |
0.69 |
|
C2, C3 |
10uF electrolytic |
2 |
272-1013 |
1.18 |
|
C5, C6 |
.022uF capacitor |
1 |
276-1066 |
0.69 |
|
R1, R2 |
100K resistor |
1 |
271-1347 |
0.49 |
|
R3 |
10K trim pot |
1 |
271-282 |
0.49 |
|
R4, R5 |
15K resistor |
1 |
271-1337 |
0.49 |
|
R6 |
10K resistor |
1 |
271-1335 |
0.49 |
|
R7 |
1K resistor |
1 |
271-1321 |
0.49 |
|
D1-D7 |
1N914/1N4148Diodes |
1 |
276-1122 |
1.19 |
|
Q1 |
2N2222 |
1 |
276-2009 |
0.59 |
Schematic